Comox Valley

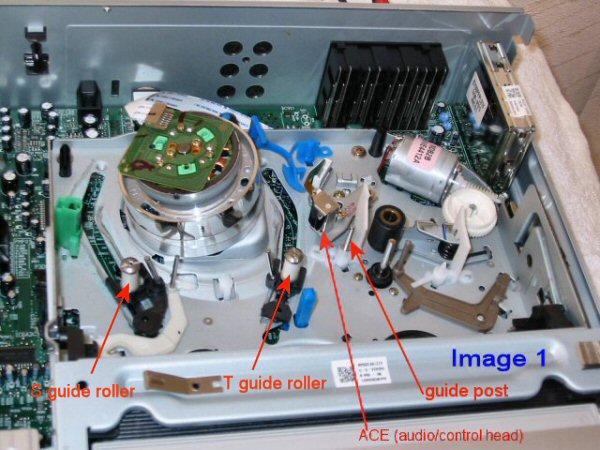
From the photo you will notice the basic tape path around the heads and other parts. Hardly no two machines are alike their adjustments are unique to each individual unit.
If the VCR needs a tape path adjustment:
- Insert a known good tape to perform the tape path alignment.
- If your machine has a manual tracking adjustment, place the knob dead center. If it is automatic tracking then continue on.
- Either with a screw driver or allen wrench slowly turn the left spindle counter clockwise.
Pay close attention to the TV, you should notice the picture changing,with a line on the bottom or the top, or the picture may totally improve. Either way it won't take long to get the feel for adjusting the spindles. If the left side shows no improvment proceed with the right side. - Be carefull when adjusting the right side the tape can start creasing. If it starts creasing back off the screw slightly until the tape is just on the video head drum ledge. You may have to go back and forth a few times until the picture on the TV clears up.
- As mentioned earlier try adjusting the audio head first you may see instant results.
- If after doing the head adjustments and the picture returns to normal,you may notice some old tapes do not play as well. That's because the VCR was dirty and out of adjustment at the time.
Scifi2K
Adjusting a VCR with pots
 The Green Arrows indicate where the pots are that you are going to adjust. You will now need the small phillips screwdriver for the adjustment. Now you can really take a look at the VCR's guts.
In Figure 4, the green arrows are showing you the two pots for adjusting the sound and video. Put the VHS tape into the VCR unit. Push play and make sure you've got audio and video on the TV. It's time! Take the small phillips and pick a pot to adjust. (Pots are sensitive and require very little adjustment to make changes.) Pick the right or left pot and turn clockwise or counter-clockwise
Sound or Video: By adjusting the pots you will either see or hear an improvement or it will get worse.
Once you have the best quality from both pots and are satisfied stop the tape and eject it.
Ecoustics
Turning off the automatic tracking
On screen message saying "PLAY", then "A. TRACKING" and then a short time later after the tracking has set another message that says "PLAY HI_FI".
At this point, provided the picture on screen is good, on the remote you can press either the up arrow (TRK +) or down arrow (TRK -), one press should turn off auto tracking. These are the tracking fine adjustments under the title "PR/TRK" (in blue). If necessary, a few more presses of those buttons might be needed if there's noise bars appearing.
If you want to restore the tracking back to auto, just press the "0" key while playing or eject and reinsert the tape. Mine played fine after turning off the auto tracking.
Another Guide
 Just a warning for those that may have little or no electrical knowledge ... there is HIGH VOLTAGES present inside the VCR so keep well away from the power supply area in the back left corner where the power cord goes in. If possible, don't touch any components inside at all, only the screws on the ACE head need turning with a small screwdriver. Keep one hand on the screwdriver and the other in your pocket! YOU HAVE BEEN WARNED.
Just keep the adjustments small, like 1/4 turns on the screws, so you know what you've done and can reverse it if necesary.
Firstly, see if you can see the control head. If so then yours is out of alignment. The tapes in mine were riding so high they barely picked up a signal at all. Step 2 was needed as the tape bowed out slightly at the top on exit from the T guide roller. It should be dead straight. The tape was running a tiny bit low on the guide post following the ACE head. You do need to look carefully as the amount may be just a 1mm at most and creasing the edge of your tapes. It was obvious to me once I saw it but I already knew what to look for.
The main culprit in my case- the tape was completely missing the control head at the bottom of the ACE head assembly. It may be hard to see the heads when adjusted properly, but if you CAN see the bottom one then it needs adjustment.
Once you're happy with the adjustment start plugging in prerecorded tapes and make sure they track over the heads and rollers properly and of course, play properly. I did find 1 tape out of many that still rode high on the heads but I haven't worried about it as it's not much good anyway. But it does suggest that for some reason, these adjustments in this recorder may not be perfect.
2 more links on repairing all kinds of VCR faults
www.fixer.com
www.repairfaq.org